Takingphotos during a scenic balloon flight is a unique opportunity to capture spectacular landscapes from altitude. However, taking photos from the gondola requires proper preparation and technique. You need to adjust your camera settings to the changing light conditions and the movement of the balloon. Wide-angle lenses are great for capturing sweeping panoramas, while telephoto lenses allow you to focus on details seen from afar. Holding the camera steadily despite the shaking of the gondola is key to getting sharp photos.
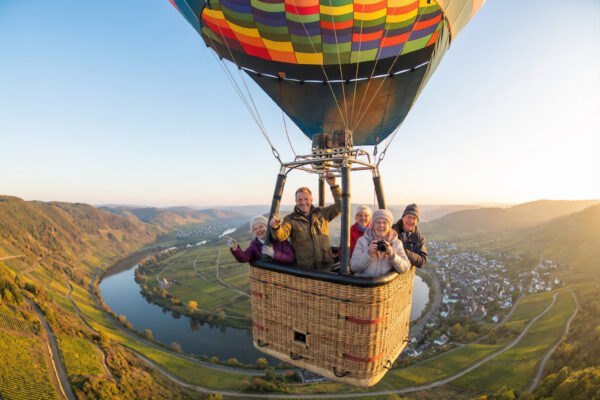
Sunrises and sunsets offer ideal lighting, giving photos a unique atmosphere. In addition to landscapes, it is worth directing attention to the balloon itself and its interior, which offers the opportunity to take unconventional photographs. Skillful framing and composition help create interesting and dynamic images. A balloon flight becomes an unforgettable experience, which allows you to see the world from a perspective that is not available in everyday life. With the right approach, you can capture moments full of charm and emotion.
Choosing and preparing the right photographic equipment for a balloon flight
The right choice of photographic equipment is crucial for getting the best pictures during a balloon flight. The choice of camera is important – a DSLR or mirrorless camera provides more control over settings and higher image quality. However, even a modern smartphone can produce satisfactory results.
As for lenses, it is recommended to have two: a wide-angle lens and a telephoto lens. A wide-angle lens, in the 16-35mm range, is perfect for capturing sweeping landscapes and entire balloons. A telephoto lens, such as the 70-200 mm, allows you to take close-up shots of distant landscape details or other balloons floating in the air. It is important to avoid excess equipment – the cramped space of the gondola makes it difficult to change lenses frequently.
List of necessary equipment:
- Camera (DSLR or mirrorless),
- Wide-angle lens (16-35 mm),
- Telephoto lens (70-200 mm),
- Spare batteries,
- Memory cards,
- Polarizing filter.
Securing the equipment is very important. A neck strap or harness will prevent accidentally dropping the camera from a height. A lightweight monopod can help stabilize the camera during flight.
Camera settings require care. Before taking off, set the camera to aperture priority or manual mode. It is advisable to start with an ISO of 800 to compensate for poor lighting at dawn. As the brightness increases, the ISO can be gradually lowered. The shutter speed should be at least 1/250th of a second to avoid blurring caused by balloon movement.
It is worth taking care to protect the equipment from changing weather conditions. A waterproof bag will effectively protect the camera from moisture or rain. A microfiber cloth will be useful for cleaning the lens in case of fog or condensation.
Preparing the equipment while still on the ground avoids problems in the air. Charging the batteries, formatting the memory cards and checking the camera settings will provide peace of mind when shooting from a balloon. This allows your attention to focus solely on capturing special moments and views.
Taking advantage of light at different times of the day when photographing from a balloon
Light plays an extremely important role in balloon photography, and its nature changes throughout the day. The most favorable conditions are during the so-called golden hours – shortly after sunrise and just before sunset.
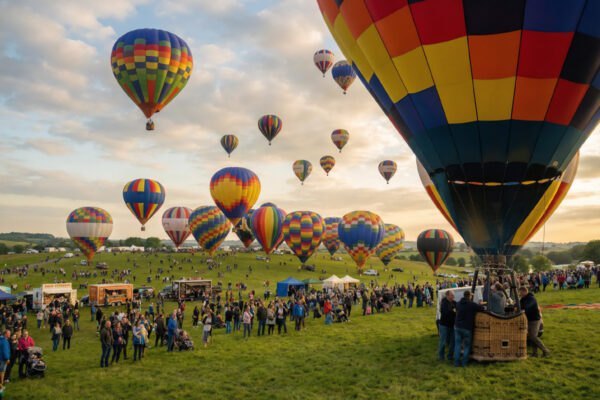
Morning balloon flights offer unique opportunities. The soft, warm light at dawn gives the landscapes a unique character. At this time it is good to capture panoramic views of balloons hovering over misty valleys. The sun’s low setting creates long shadows that add depth and texture to the photos.
As the sun rises, the light becomes more intense, creating ideal conditions for photographing details. Details of other balloons and landscapes below can then be captured. The stark contrast helps to produce images with strongly outlined shapes.
Tip: A polarizing filter during morning flights effectively reduces glare and enhances sky colors.
Afternoon and evening balloon flights also have their own unique charm. The warm, golden light of the setting sun introduces a romantic atmosphere. Photos showing balloon silhouettes against a colorful sky are ideal in such conditions. Experimenting with exposure settings allows you to capture the dramatic contrasts between the bright sky and the dark shapes of the balloons.
For nighttime balloon shows, it’s a good idea to use longer exposure times to capture the streaks of light emitted by the torches. In this case, it is recommended to use a tripod and try different exposure times – from 1/15th of a second to several seconds, depending on the desired effect.
Dynamic changes in lighting conditions in the balloon require a willingness to frequently adjust camera settings. Regularly checking the histogram allows you to avoid overexposing bright parts of the frame.
Regardless of the time of day, the key to successful photos remains patience and careful observation. Light changes quickly in a balloon, so wait for the perfect moment when the sun’s rays illuminate the landscape or balloon in a way that gives the photo a unique character.
Composition techniques for unique bird’s eye shots
Aerial photography opens up new possibilities for creating unique compositions. To take full advantage of the perspective from altitude, proven techniques that highlight the unique nature of the frames can help.
Rule of threeseparation
Divide the frame into nine equal parts using two horizontal lines and two vertical lines. Placing key elements along these lines or where they intersect gives the photo a harmonious and eye-catching layout. For example, the horizon can be along the top or bottom line, instead of in the center of the frame, adding visual dynamism.
Guiding lines
Natural or artificial lines, such as roads, rivers, coastlines or paths, direct the viewer’s eye through the photo. Composing the frame so that the lines lead to the main subject or create an interesting path enhances the impression of depth and conduction of attention.
Patterns and symmetry
A view from above often reveals patterns and symmetrical arrangements not visible from the ground. Repeated shapes in landscapes, architecture or nature attract attention and create cohesive, striking compositions. Breaking symmetry with a contrasting element introduces additional visual interest.
Negative space
Empty areas around the main motif help to emphasize its importance, introducing a feeling of isolation or vastness. Vast expanses of sky, water or uniform terrain can enhance the message of the photo and give it a minimalist feel.
Tip: Experimenting with different flight altitudes opens up further possibilities. Lower ceilings allow you to capture details and more intimate shots, while higher altitude reveals vast landscapes and unique patterns in nature.
Observation and patience play a key role in aerial photography. Multiple flights over interesting terrain increase the chance of finding the perfect composition. Changing light and weather conditions can significantly alter the appearance of a scene, so flexibility and readiness to react quickly to new opportunities are invaluable.
Capturing the balloon preparation and launch process
The preparation and launch of a balloon create a remarkable spectacle, full of photographic opportunities. To make the most of these moments, specific tips on equipment, techniques and creative approaches can help.
Equipment preparation
To photograph the process, you will need the right equipment. A wide-angle lens with a range of 16-35 mm will allow you to capture the entire scene, while a 70-200 mm telephoto lens is suitable for capturing details. In low light at dawn, it’s a good idea to use a higher ISO, such as 800-1600, to compensate for the lack of light.
Documenting the process
You can start photographing from the first moments of preparation, such as unpacking the balloon from the truck. Subsequent steps, such as unfurling the shell, attaching the basket, inspecting the burners and slowly filling the balloon with air, create a coherent narrative of the event. Each of these moments offers unique compositional possibilities.
Inflating the balloon
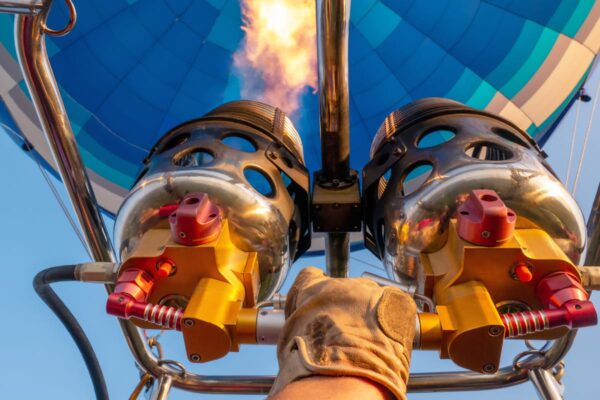
Filling the balloon with hot air is one of the most spectacular stages. Photos taken from a low perspective, right next to the balloon, allow you to capture the flames from the burners and the illuminated interior. You can also photograph the interior of the balloon as it is being filled, using ISO 800 and a wide-open aperture to ensure the right amount of light.
Balloon launch
The launch is the culmination of the entire process. To capture this moment, it’s best to position yourself so that the balloon is visible against the rising sun. A fast shutter speed, such as 1/250th of a second, will keep the movement in the frame. Experimenting with different angles, such as shots from below as the balloon rises overhead, can yield spectacular results.
Creative approach
Looking for interesting details makes your photos unique. You can focus on the texture of the balloon material, the emotions of the crew and passengers, or the balloon’s reflections in the environment. Light and shadows, especially during the golden hour after sunrise, create additional opportunities for photographic experimentation.
The key to successful photos is patience and observation skills. Dynamically changing lighting conditions require quick adjustment of camera settings. Carefulness and flexibility allow you to capture unique moments and create a complete and interesting story.
Optimal camera settings for aerial photography
When shooting from a balloon, proper camera settings play a key role in achieving sharp and well-exposed images. Although the balloon moves more slowly than other means of air transportation, both movement and changing lighting conditions must be taken into account.
Shooting mode
The most commonly selected mode is aperture priority (A or Av), allowing you to control depth of field while automatically adjusting the shutter speed. This is especially useful in situations where lighting changes dynamically.
Aperture settings
In balloon photography, the aperture does not need to be tightly closed, since most subjects are at a considerable distance. Using wider apertures, such as f/2.8 or f/4, allows you to use faster shutter speeds and lower ISO values.
Shutter speed
A fast shutter speed prevents blurring caused by balloon movement and air vibrations. A time of no more than 1/500th of a second is recommended, and preferably 1/1000th of a second or less.
Tip: The virtual level or grid function in the viewfinder, if available, makes it easier to maintain a straight horizon, which can be difficult during flight.
ISO and white balance
ISO settings depend on lighting conditions:
- Early morning or sunset: ISO 800-1600,
- Full daylight: ISO 100-400,
- Cloudy day: ISO 400-800.
White balance is best set to “daylight” or “overcast,” depending on the weather. Shooting in RAW format allows for easy white balance corrections during editing.
Light metering mode and autofocus
Matrix or center-weighted metering works best in variable conditions. Spot metering can be less effective. In terms of autofocus, continuous mode (AF-C or AI Servo) is recommended, as it handles moving subjects better.
Image stabilization and RAW format
Enabling image stabilization, if your equipment has it, minimizes the impact of shake and increases the sharpness of your photos. Shooting in RAW format offers greater editing capabilities, which is especially useful in difficult lighting conditions.
Following these tips significantly increases the chances of getting photos that are sharp, well-exposed and full of detail that capture the unique atmosphere of a balloon flight.
Creative photo ideas for other balloons and landscapes
Balloon photography is a unique opportunity to capture extraordinary shots of other balloons and the surrounding landscape. The success of such photos depends on a creative approach and taking advantage of the unique perspective that high-altitude flight provides.
Photographing other balloons
When observing other balloons, look for interesting patterns and arrangements that form in the sky. Arcs, triangles or lines created by the arrangement of balloons can bring harmony and dynamism to a photo. Experimenting with the composition allows you to achieve original effects. For example, partially covering one balloon by another can give the photo a sense of depth and scale.
Tip: Capturing the moment when the balloon dips into the clouds or mist can give the photo a unique, almost surreal feel.
Photographing the landscape
An aerial perspective offers an unusual opportunity to explore patterns and textures on the ground. Meandering rivers, geometric shapes of fields or shadows cast by clouds create unusual compositions that are difficult to see from ground level. Contrasts between different types of terrain, such as forests and fields, add to the visual impact of the photos.
Light plays a key role in landscape photography. Early morning or late afternoon lighting, which creates long shadows, adds depth and drama. Experimenting with different flight heights opens up further possibilities – a lower altitude allows you to capture more detail, while a higher altitude exposes the sweeping patterns and structures of the landscape.
Combining landscape with balloons
Harmonious shots can be created when landscape elements and balloons are combined in a single frame. With a dynamic in-flight perspective, the changing arrangement of balloons and surroundings offers numerous opportunities to explore new compositions. Elements that initially appear small can dominate the frame over time, creating surprising visual effects.
Details and contrasts
Details, such as fragments of balloons juxtaposed with the landscape, can become the subject of abstract and original shots. The intense colors and varied shapes of the balloons provide an interesting contrast to the natural background, highlighting the richness and diversity of the scene.
A creative approach to balloon photography requires careful observation and patience. Multiple flights over a selected area increase the chances of finding the best composition. Dynamically changing light and atmospheric conditions can significantly affect the appearance of a scene, so flexibility and readiness for unexpected occasions are invaluable.
Photographing the interior of the balloon and details of the structure
The interior of a balloon and its structure provide unique photographic opportunities often overlooked by less experienced photographers. These unusual frames not only show the technical aspects of the balloon, but also add depth and variety to the reportage of the flight.
The ideal time to photograph the interior of the balloon
The best time to capture the interior of the balloon is during inflation, when it is lying on its side. Then it is possible to look inside, where symmetry, lines and vivid colors create striking compositions. Photographing from a kneeling or lying position allows you to eliminate unnecessary elements from the frame and get more interesting shots.
Tip: To photograph the interior of the balloon, it’s a good idea to use a wide-angle lens (16-35 mm) and set a high ISO (800-1600) to cope with the limited lighting.
Details of the balloon’s construction
Capturing the technical details of the balloon adds layers of narrative to the photographic report. Elements that deserve attention include:
- The crown of the balloon, or the top of the canopy with the deflation port,
- Temperature indicators inside the canopy (telltale),
- The red deflation line (rip line) used to deflate the balloon,
- Burners, which are the source of heat necessary to lift the balloon,
- The basket, which serves as a seat for passengers and the pilot.
Photographing the burners and basket
When photographing the burners, it is a good idea to position yourself behind the pilot. When the flames are activated, you can capture the intense colors of the fire – from orange to blue – and the contrasting interior of the balloon. The presence of the pilot in the frame adds dynamism to the photos, especially when his silhouette takes dramatic poses as he works.
The basket of the balloon is another interesting subject to photograph. Ropes, valves, propane cylinders or navigation instruments can tell a story about the technical side of the flight. Macro shots or those taken with a telephoto lens at close range can capture details that often escape attention.
Experimenting with perspective
A variety of angles and perspectives can yield surprising results. Photos taken from below, when the balloon is already filled, expose the monumental scale of the structure. Equally interesting are shots showing the interior as it is being filled, especially using a wide angle.
Safety during photography
Safety should always be kept in mind when taking pictures. Diligently following the instructions of the pilot and ground crew is key. Do not interfere with procedures or touch equipment without permission from the crew.
Photographing the interior of a balloon and details of its construction is not only a way to create interesting frames, but also an opportunity to better understand this fascinating form of aviation. Varied photos from such sessions can become a valuable addition to any portfolio.
How to avoid common mistakes when taking photos in the air
Taking photos from a balloon offers amazing opportunities, but it also comes with some challenges. Here are tips on how to avoid the most common mistakes and get exceptional photos while flying.
1. Stabilize your camera
The movement of a balloon can cause shake, which affects the sharpness of your photos. Using high ISO values and fast shutter speeds can reduce the effect of shake. The image stabilization function in the camera or lens provides additional support in such conditions.
2 .Shooting through balloon windows
Plexiglass windows can generate glare and image distortion. If it is necessary to photograph through a window, place the lens close to the glass and use a sunshade to reduce reflections.
Tip: Whenever possible, it’s a good idea to ask your pilot if you can open a window or door. However, always observe safety rules and follow the crew’s instructions.
3. Framing photos
The changing perspective in the air requires flexibility in framing. It is advisable to leave a larger margin in the frame, which allows you to crop the image later without losing important elements.
4. Exposure control
In-flight light can be difficult to control, especially at sunrise or sunset. Using the histogram helps avoid overexposure and underexposure. Exposure bracketing can be useful in high-contrast scenes.
5. Capture landscape detail
Panoramic views are impressive, but don’t ignore the finer elements that add character to your photos, such as:
- Balloon shadows on the ground,
- Geometric patterns of farm fields,
- Reflections in lakes and rivers,
- Other balloons against the sky.
6. Frequency of photography
Scenes in the air change rapidly, so shooting regularly provides a greater selection of material. It is better to have more shots for selection than to miss the opportunity for unique frames.
7. Variety of composition
Experimenting with different angles and heights allows you to capture various aspects of landscapes. Photos taken both from a bird’s eye view and from a lower perspective create an interesting contrast.
8. Equipment safety
Protecting your camera is key. A strap or harness prevents equipment from accidentally falling, which could cause serious damage and danger to those on the ground.
Good preparation increases the chances of success. Before flying, familiarize yourself with the equipment’s functions so that when in the air you can focus on shooting, not on camera settings. Practice and experience help you avoid the most common mistakes, allowing you to enjoy the full satisfaction of creating unique photos while flying in a balloon.
Summary
Taking photographs during a balloon flight is an extraordinary experience that requires proper preparation and knowledge of techniques. Selecting the right equipment, skillfully using light at different times of the day, and being creative with your composition are crucial. It is also important to document the process of preparation and launch of the balloon to create a complete story about this unique event.
Optimal camera settings, such as the right shooting mode, a fast shutter speed and a properly selected ISO, make it possible to obtain sharp and well-exposed photos in changing aerial conditions. Experimenting with perspective allows you to capture both other balloons and landscapes as seen from the air. Don’t overlook details of the balloon’s construction, which can make an attractive subject for photography.
Avoiding common mistakes, such as lack of camera stabilization or ill-considered framing, leads to better results. Practice, patience and openness to experimentation are important and help create original and unique photos. Applying these principles allows you to capture the beauty and magic of balloon flight, creating images that are memorable for a long time.